Pages

Sunday, November 16, 2014

Illustrated Faith


My intention is to focus this blog on creating.  But sometimes other parts of my life will creep in to provide context for some of the creative attempts I share.  This is one of those days.  I hope you don''t mind.  (Some of you might have read this in the facebook bible journaling group.)

I've never had a very strong or specific faith.  I was raised in the Catholic church and have always believed generally.  But my husband, second son and daughter have always had much stronger, more committed spiritual lives.  So when I was first exposed to the concept of bible journaling on Shanna Noel's blog (she is amazing!), I was surprised that I was so drawn to the concept.  I told my husband and daughter I wanted to try it.  But they were appalled - to both of them it seemed disrespectful and like an excuse to spend more time in my scraproom.  So I let it drop.

But the idea stayed in the back of my mind.  And one Sunday evening when we attended mass at an older church I was captivated by the colors coming in the stained glass windows.  I felt like God was telling me that using my creative side to explore my faith was the path that would work for me.  So I told my husband and daughter that I hoped they would understand, but I was going to explore bible journaling.  I was stunned when they pulled out a bible they had bought me for just that purpose.

My 14 year old daughter told me that she had come to the conclusion that anything that led me to reading the bible was ok.  Out of the mouths of babes . . . . .


So I've begun exploring the bible.  Sometimes I read the church reading for the day, sometimes I am inspired by a prompt from Shanna Noel and sometimes I open the bible at random and read.  Then, if I am inspired, I travel into my craft room and go at it with stickers, stamps, ink, shipping tags, you name it.  Over time I hope my bible is full of color and joy. 


Thanks for stopping by and letting me share.

Saturday, November 15, 2014

Scraps!

No doubt about it - pretty patterned paper is one of my weaknesses.  I probably have more patterned paper, carefully sorted by color and pattern, than I can use in my lifetime.  And there is no question - I continue to fall in love with no collections and add more paper to my stash.

But I hoard my paper.  I hate throwing even small scraps away.  And those scraps go into hanging files, sorted by color and pattern.  I use them as layering pieces sometimes.  And if they are big enough pieces, I use them for cards.  Or I go there when I think a project needs just a splash of a certain color.

But last week one of the challenges during the pinspiration crop at My Scraps and More was to create a layout inspired by a picture of a rubik's cube.  And I challenged my self to use only scraps (other than the layout base).  And of course embellishments were fair game.

So I pulled scraps of 9 different papers - I chose different colors and patterns.  And then I cut 3 inch squares and arranged them in a simple grid pattern.  Once I liked the arrangement, the adhesive came out and I created the base for this layout.


I layered on 3 3x3 photos with a white border from Persnickety Prints and went to town with the embellishments.  The Heidi Swapp color magic die cuts worked really well because I could use my inks to get just the color I wanted.  I also added stickers, paper scraps, enamel dots and buttons.  And of course, a layout is almost never done til there are ink splatters.

 So use those scraps and link me up to your projects.  I could use some new ideas.

Giveaway alert:  Don't forget the blog rebirth giveaway.  There are only a couple more days to enter.

Have a great Saturday.  Thanks for stopping by.

Friday, November 14, 2014

An Unlikely Favorite

I am really a pretty simple scrapper.  I love the look of all the mixed media techniques, and even have acquired some of the supplies.  But I really don't play with them very often - I either worry about ruining a project or am unhappy with the results.  Let's face it - ink splatters were a big achievement for me.

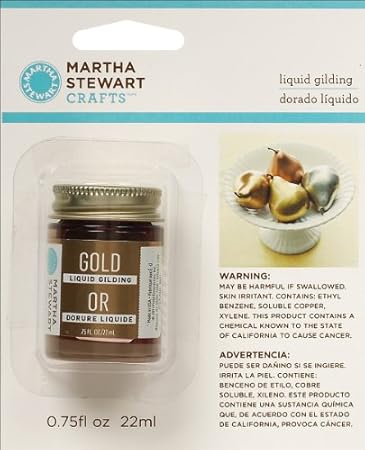
So boy was I surprised when one my mixed media purchases turned into one of my scrap room favorites.  Its the Martha Stewart Gold Liquid Gilding.

Martha Stewart 32214 0.75-Ounce Liquid Gilding, Gold 

It is super shiny and dries super fast.  And it makes a huge impact whether you use it in a subtle way... 

Use it with a paint brush to emphasize embossing (see the wood tape in this layout) 

make really unique ink splatters like these where the gold separated from the solvent 
 .....or in a big way

painting a large piece of wood veneer for quick and easy title


stamp with a cork on a transparency for a one of a kind background
I do have a couple of cautions - you need to use it in a well ventilated space and I have ruined more than one paint brush.  So now I have a couple I keep for just this product.  (At my husband's suggestion, I use windex to clean them and it works pretty well, but I think I need to buy some brush cleaner at the craft store).  Or, depending on the project, I use a foam brush and throw it away after I'm done.

And wait til you see my December Daily cover next week - I am so excited to share it.  

Now I have to go shopping - I just found out this product comes in a copper finish - I think I might just need that.

Giveaway Alert:  There are still a couple days left in my blog rebirth giveaway.

Thanks for stopping by!


Thursday, November 13, 2014

Happy Birthday Stephen

My oldest son turns 22 today.  It is super hard to believe and seems like he was just a sweet little baby.  So today is all about Stephen (even though he visited on the weekend and we celebrated then). And I have two recent layouts about Stephen to share. 

The first one is using an old baby picture I dug out over the weekend. 


It;s a super simple design, but check out that shipping tag.  I used a silkscreen from a past Studio Calico kit and Color Theory gold acrylic paint to add those stars.  It looks amazing and was so easy - it took maybe two minutes.

And here;s a layout of a recent picture.  Stephen recently started culinary school and I loved this picture his girlfriend texted me.  He looks like he stepped right out of that Disney move - Ratatouille.


I loved the picture so much that I ordered in a 6x12 size.  I wanted the full impact of the hat.  Plus, a 6x12 picture means a really easy layout - a couple strips of paper and a couple of embellishment clusters and you are done!

Giveaway reminder:  Don't forget to sign up for the blog rebirth giveaway.  It's open til Sunday at midnight.

Thanks for stopping by!

Wednesday, November 12, 2014

Workspace Wednesday - The Wall

It's confession time - I love playing with all that pretty paper and those embellishments.  But I think I love sorting and organizing them even more.  And I've come up with some pretty awesome and inexpensive storage options.

Everybody needs to come up with the storage plan that works for them.  And there are really three factors to consider.
  1. How much space do you have?  I'm lucky enough to have a great husband who, with minimal complaining, gave up our dining room so that I could have my own scrap room right in the middle of the house.  (If it wasn't in the middle of things, the odds of me using it were greatly reduced.) And this means I can have "permanent" storage instead of having to put everything in a closet when I am done with it.
  2. How do you scrap?  - I tend to scrap by color so I sort my supplies (paper, inks, die cuts, trim) by color whenever possible.  But if you scrap by collection, your storage should be by collection.  And if you scrap by theme, store your supplies by theme.
  3. Do you like everything put away or do you need to see it to use it?  I definitely fall in the second group.  Anything I can see is 100% more likely to end up on a layout.  If it is put away in a drawer or a cupboard, I won't find it til I do a big purge.  (But it needs to be organized and I try hard to keep my desktop clear.)
So when my inks, washi tape and some other embellishments were piling up, I decided to use a simple pegboard.  My husband helped me get it hung up and I am in love!  It is my new favorite thing.


 First hint:  Don't by a fancy pegboard at the craft store.  Instead go to the hardware store and by the inexpensive pegboard that your husband would use in the garage.  You can cut it to fit your space and paint it white.  And the hooks are super inexpensive.


 My pegboard is basically divided into thirds.  The first third holds shipping tags (sorted on to big rings by color), my silkscreens and some random embellishments.  I had no idea how many shipping tags I had bought until I sorted them this way - now I won't buy more unless I need them.  And remember to think about binder clips to hang things that don't seem to be hangable.


The middle has some simple shelves.  The brackets are just 6 inch pegs.  The shelves are boards my husband cut for me.  And that little basket holds my glue dots, tiny attacher, and misc adhesives.  Plus there is room to show off some pretty things -- like that Ashley Goldberg print and that beautiful card I received in a happy mail exchange at Studio Calico.


And the last third is for washi tape.  I am using 12 dowels cut into 12 inch lengths and simple hooks.  The dowels are long enough to hold quite a few rolls of tape and short enough to be easy to use.  And I know that it is a lot of washi tape - but I don't think I ever finish a roll.

If you have a good storage tip, I hope you will share it in the comments.  I am always ready to reorganize!

Giveaway alert:  If you haven't commented yet, don't forget my blog rebirth giveaway.  It's open til Sunday, November 16th.

Thanks for stopping by. 

Tuesday, November 11, 2014

Pinterest Inspiration

Pinterest is one of my favorite spots when I can't get started.  And this week My Scraps and More is hosting a pinspiration crop.  It has been lots of fun.  The best part is that the design team there took me to some different places for inspiration - and those layouts have been some of my favorites. 

Tracy picked a travel pin as her inspiration piece  I loved all the colors and textures and the way the buildings seemed to tumble down the side of the mountain.


Those things provided great inspiration for this layout with a random picture of an antique car I took at a rest stop on a family weekend.  (I love old cars!)


Since I tend to line things up and make things straight, this was a great chance to do something a little different.  And look at all those embellishments I got to use - wood veneer, thickers, die cuts, cork from freckled fawn, and those awesome Studio Calico Lemon Lush sequins.

Don't forget to enter the blog rebirth giveawayIt's open til Sunday at midnight - and I keep sticking more things in that bag of goodies.

Thanks for stopping by!  And let me know where you go for inspiration!

Monday, November 10, 2014

Its A Blog Rebirth (With A Giveaway Of Course)

Hi!  I'm so excited to be back with a great new look, a plan for keeping up, and a great giveaway (or two or three or .....).  (wa

You may have visited in the past - there was a time when I enjoyed sharing my projects here regularly.  It was lots of fun!  But somewhere along the line, I lost my focus and didn't create quite so many pretty things.  But things are on track now and I'm excited to be back.

I have a fresh (for me) view on life and creating and I wanted a new look for my blog that showed that.  But I am not a techy girl - so I did what any self respecting non-techy creative girl would do - I went shopping on etsy.  I wanted a clean design that was a little girly, maybe a little sparkly, and uniquely mine - and since this is just for fun - I wanted inexpensive.  I found Blog Parlour (formerly PinkLovesGold).  Christine put together this beautiful custom design for me - she was great to work with and really captured the feeling I wanted for my blog.

If you have seen my work, you know I love embellishments.  I love mixing colors, textures and little bits.  So I chose a layout were I played with doilies, die-cuts, alphas, acrylic pieces, sequins, woods, and frames to share.  This is one of my favorite recent projects. 


My favorite thing here are those stars from the Studio Calico South of Market line.  I used Martha Stewart gold liquid gilding to add texture and shine and loved having a custom embellishment.

Now for the important stuff!  Any good blog rebirth should feel like a party.  And the best way to party with my online friends is a good giveaway.  Since today's layout was about the embellishments, I thought an embellishment giveaway was a perfect fit.  Here's what you can win.


There are lots of goodies here - including enamel shapes from pinkfresh studios, enamel dots, a studio calico stamp, exclusive items from studio calico kits (that washi was in a subscriber exclusive kit and is gold!), freckled fawn goodies, enamel dots, a limited edition mister hueys, my minds eye buttons .... the list goes on and on.  And I have to admit that I've continued to add some of my favorites since I took this picture.

So here's how you can enter:
  1. follow my blog (writing is a lot more fun if people read it) and
  2. leave me a comment - about the new look for my blog, what you want to read about, or even what you want to win.  (Another giveaway is coming soon)
  3. You can get extra entries if you share on other social media sites.  Come back here and leave me a link.
  4. Entries will close on Sunday November 16th at midnight.  The winner will be posted here that week.
Thanks for visiting, reading and commenting.  I'm really excited about starting my blog back up.  I hope you stop by often.  

Thursday, October 31, 2013

Quick and Simple

I love embellishments - and it usually shows in my layouts.  I love mixing patterned papers and embellishments to create a unique look whenever I sit down to scrapbook.  But those layouts can take hours - or even days - to complete.  I keep moving the bits and pieces trying to get the perfect look.  And as my husband often reminds me, it is about the pictures, not the embellishments.

So I decided to try something simple with this week's Studio Calico sketch challenge.  I started with the card sketch.
I pulled out three sheets of patterned paper, a sheet of typed phrases from the Antiquary kits, some gold star rub-ons from Printshop, some Pink Paislee Color Wash Alphas, and a scrap of blush POW paper.  And I set a timer for 45 minutes.  Here's what I came up with.


And I have to admit that it is one of my recent favorites.  So maybe I don't always need all those embellishments (even if they are lots of fun to play with)>

Thanks for looking.  I hope you have a terrific Thursday!

Wednesday, October 30, 2013

Gratitude Documented

Shanna Noel introduced me to the Gratitude Documented project.  Each day in November you document something you are thankful for - big or little.  Since I'm struggling to find the positive in life lately, it seemed like the perfect project for me.  So this weekend I spent some time pulling together a kit.  (I have way too much pulled but editing to this point was tough enough)

I chose a Basic Grey Capture album for my project.  I want a feminine feel for my project.  And the decorative binding, dividers and pages are a perfect start.  I love the variety of pages and page protectors you get in a Capture album.


The dividers and pages provided a starting point for my album, but this sheet of patterned paper from Printshop served as my true inspiration piece as I picked the rest of my supplies.  I love the colors and soft feel to this paper - definitely feminine without being fussy.


Next I dug through my 6x6 paper to pull some sheets that might work.  And I might have a 6x6 pad from Printshop on its way here for this project too.


Next I pulled some Project Life style cards - most of them are from Studio Calico kits.


Then came my favorite part of any project - embellishments!  I started with washi tape and glitter tape because I thought it would be easy to choose. 


Then two of my favorites - wood veneer and enamel dot style embellishments.  Here's what I picked.


Next came stickers - I picked both dimensional stickers and traditional stickers and labels.  I also tried to mix different manufacturers and lines to get an eclectic look.


Then came tags, bags, envelopes and folders


And then there were some miscellaneous elements I just loved for this project - like the wood card from Studio Calico and the metal leaves from Freckled Fawn.  


And no project is complete without diecuts and transparent elements.  I picked a pack from Basic Grey's Mint Julep collection, Dear Lizzy Fifth and Frolic Chipboard and some chalkboard pieces from Studio Calico's Thataway collection.


And finally alphas - I tried for a variety of sizes, fonts and textures.


And if that wasn't enough, I know I'll be digging into my stash for inks, sequins and other bits and pieces - I'm just not good at limiting myself when it comes to supplies.  

I'm excited to get started with this project.  I think its going to be a fun project to put together and really good for my outlook on life.  Now, what to do with that album cover?  

Have a wonderful Wednesday!

Monday, October 21, 2013

Five Easy Cards

For Studio Calico stamp sale list go here.

More often than not, making cards just frustrates me.  I struggle with the scale and am rarely happy with my end results.  So no one was more surprised than me when I took on the five World Card Making challenges at Studio Calico.  And I had a good time with the challenges - they really helped me focus on specific elements and put together some quick and easy cards. Here's what I came up with.

The first challenge was to use this mood board.

Here's what I came up with.


The second challenge was to incorporate an ombre element.  I used some awesome pink and green ombre washi from Pinkfresh Studio and Amy Tangerine chipboard for this simple card.


The third challenge was to use your scraps.  I used a couple paper scraps, the end of a piece of trim, some Freckled Fawn leaves and a few sequins for this quick thank you card.


The next challenge was to use five of something.  I added five pieces of wood veneer from the Licorice add-on for this fun Halloween card.  I loved adding aqua, a non-traditional color to the mix.


The last challenge was a sketch challenge.  There were several choices, but I chose this one
for this quick card using a Glitz 6x6 card, a strip of washi from the Container Store, some wood veneer and a Fancy Pants tag.


These were so fun and easy I might just be inspired to make some more cards some day soon.  Thanks for looking.  I hope you have a marvelous Monday!


Sunday, October 20, 2013

To Purge Or Not To Purge

List of Stamps Updated on October 21, 2013

I see lots of threads and blog posts about purging supplies and cleaning out supplies.  But I love all my scrapping goodies and love being surrounded by lots of beautiful supplies.  So I am one of the world's worst purgers.  I just keep adding more to my stash.

I'm blessed to have a room to call mostly my own for my scrapping and a husband willing to invest in lots of storage and organizing pieces.  He even built me a custom desk with lots of storage.  But even so, once in a while I'm forced to take a look at my space and think about what I don't use.  After all, I have to make room for new things, right?

I've been thinking about my space and organization for a couple of weeks.  And I really couldn't bring myself to part with much of anything.I still wanted it all.  There was only one thing I didn't use much that I thought I might be willing to part with - stamps.

I've been subscribing to Studio Calico for more than a year, for a while got both the scrapbook and project life kits, and often get the add-ons.  That's a lot of stamps - and I almost never stamp.  I don't do it enough to feel proficient.  In fact, I rarely think about using my stamps.  So I went through all my stamps and pulled out my favorites.  The rest have to go.

I few have gone to friends who expressed an interest and a few more have gone to people who have contacted me directly.  But the rest are up for sale.  If you're interested, the list of stamps available with prices (which do not include postage) is below.


Antiquary – Live Creatively $5

Antiquary Add On 1 – Amsterdam – Navy Pier Numbers $10

Antiquary Add On 2 – Vienna – Lovely $5

Antiquary Add On 3 – Rome - $7

Antiquary PL Add On – Dublin – Check One $10


Double Scoop – Add On 2 – Licorice – Magic $5

Double Scoop – Add On 3 – Waffle Cone – Star Light $7


Marks and Co. - Add On 1 – Bronte – Play $7

Marks and Col. - Add On 3 – Salinger – Yum $10

Marks and Co. - PL Add On - Steinbeck – Loved $7


Valley High – Amy Tan Love $7

Valley High – Add On 2 – Jennifer – Adventure Begins $10

Valley High Card Kit – Hello $10

Valley High Project Life Kit – Happy Mail $10

Valley High Project Life Addon – Ate This $5


Roundabout – Add On 3 – Savannah Shore – This Makes Me $5

Roundabout Project Life – Lets Be Adventurous $5


Planetarium SB Kit – Amy Tan – This $5

Planetarium Add On 1 – Orion – Life Is Pretty Amazing $5

Planetarium Add On 3 – Lyra – Believe In Yourself $7

Planetarium PL – Amy Tan Numbers $7

Planetarium PL Add On – Haileys Comet $7


Spencer - Project Life – Hello Forever Stamp $7


Neverland – Scrapbook – Loving This $5

Neverland – Tink Add On – Amy Tan Roller Stamp (out of package) $5

Neverland – Project Life – perfect day $7


Front Row Scrapbook Kit – skyline(not in original packaging) $5

Front Row – Matinee Add on – Lets Go On An Adventure $7

Front Row Project Life – Newsflash $10


Block Party – Scrapbook – Right Here Right Now $7

Block Party – Add On 3 – Pioneer Drive - New Year $10

Block Party – Project Life – Week In Review $10


34th Street – Scrapbook Kit – OKAY $5

34th Street – Murray Hill Add On $7

Sock Hop – scrapbook kit – true story (not in original packaging) $5

Sock Hop – Poodle Skirt Add On – Find Joy (not in original packaging) $7


Roller Rink – Crack the Whip Add On- Everything Will Be Ok (not

in original packaging) $7


Central High – Road Show Add On – rubber chevron background stamp

(not in original packaging) $7

Central High – The Register Add On – feather (not in original packaging) $7


Summer of 69 – scrapbook kit – labels (not in original packaging) $7

Summer of 69 – Drive In Add On – triangles/hello (not in original packaging) $7

Summer of 69 – Six String – Alpha (not in original packaging) $10


Glee Club – Scrapbook Kit – Oh Snap $5


Mind The Gap – Scrapbook Kit – interlocking circles $7


Inked Class Kit $15


Others

SC Birthday Stamp with cupcake, Its a Party, confetti – I think this

was a gift for subscribers around their fourth anniversay?

(not in original packaging) $7

SC Woodgrain Circle – copyright 2011 (not in original packaging) $5

SC This Is Where I want to Be/Circles/Anchor/Me+You (not in original packaging)

(I think this is from a kit but haven't been able to figure out which one) $7

In most cases the stamps have never been used.  If they have been used its only once or twice.  I'd love to see them go to good homes where they will be loved and used.  And, if you are interested, please let me know quickly - before my hoarder tendencies get the best of me and they go back into my desk.  

I hope you've had a wonderful weekend!


Saturday, October 12, 2013

Chic Tags Color Challenge

I love color challenges, but I have a hard time with them.  Those layouts seem to take me a long time to do.  But I love the way they can push me to mix colors differently or use colors that are outside my comfort zone.  And once in a while, I find one that really speaks to me. 

I loved the color challenge at Chic Tags this month. 


 And I had tons of paper and other bits in my stash that worked perfectly.  My challenge was editing my choices.  I ended up with a fun layout using a picture of my daughter and niece.


And I found lots of pieces from Chic Tags that worked perfectly.


It was fun to mix different tags to build my layers.   Thanks for looking at my layout.  Hope you have a super Saturday!

Tuesday, October 8, 2013

Trick Or Treat

Halloween collections are the one place where I have some self-control  Its just not a holiday that I get very excited about.  So I generally add just a few themed pieces to my stash and rely on other items to create my Halloween layouts.  And all the wonderful chalkboard themed items (which I love) are perfect for creating that Halloween feel. 

This layout used papers from Studio Calico, Amy Tangerine and My Mind's Eye.  I added the My Mind's Eye chalkboard frames, the Pebbles Halloween stickers (also a chalkboard themed project and a few pieces of wood veneer colored with a mix of spray inks) for a simple layout that didn't require a big investment in themed  products.


Thanks for looking.  Have a terrific Tuesday!


Sunday, October 6, 2013

Pinkfresh Studios

It's no secret - I love embellishments.  So I was excited to find Pinkfresh Studio.  They have lots of fun embellishments - washi tape, enamel shapes, resin shapes, and project life style cards that are fun and unique.  Friday I received a bright pink package in the mail filled with goodies from a recent blog giveaway.  They are so much fun!

I thought I'd give you a peek too . . . . .


I can't wait to play with all these goodies - hopefully this afternoon.

Have a smashing Sunday!

Thursday, September 26, 2013

Our Place

I love the beach - any beach will do, but Walnut Beach in Ashtabula, Ohio is my very favorite.  It is the beach where I spent my summers growing up.  So when my daughter told me she had chosen Walnut Beach as the thing that was meaningful to her personally for inspiration for big art project, I was over the moon.  She told me she chose it because it was "Our Place."

She's making a mosaic quilt wall hanging which will be, I'm sure, wonderful and the subject of a future layout.  But I wanted to put together a layout which captured the way I felt when she told me it was "our place." 


Love the way those Pier frames let me use all my favorite embellishments.

Thanks for stopping.