Pages

Showing posts with label workspace wednesday. Show all posts

Wednesday, May 4, 2016

Workspace Wednesday: Enamel Dots

I have two sons and one daughter.  I love them all uniquely and love to create layouts about them all.  But for years I was frustrated by all the pretty bling that just didn't work on those boy layouts.  Then My Minds Eye put out enamel dots.  I called them "bling for boy layouts."  And I went a little crazy - I think I bought one of every pack I came across for at least a couple of years - I wanted all the colors and sizes.  But it turns out I never finished a pack - ever. 


I started keeping them in a basket but it got too full.  Then I had an enamel dot drawer filled with packs of enamel dots.  It was chaos - I didn't know what I had, I couldn't find the colors I needed and I quit using them because they were too hard to find. 


 I thought about purging some of them, but honestly I will use them eventually if I can find the colors and size I want.  And I would likely just buy more.

There had to be a better way to store them.  I know some people put the packs on rings so they can flip through them easily.  But honestly, I had way too many packs for that to be functional - I would need a zillion rings.  And it would still be hard to find the color I wanted since most packs include several colors.  (I tend to look for supplies by color so that guides most of my organization strategies.)

And honestly my scrap room is full to the brim.  I don't have lots of extra room for storage so I felt like my options were limited.  But I do have a handy husband - and I have the drawer I had been using.  I just needed to make it more functional.

I wanted to do two things

  • Eliminate all the packaging - it just takes extra room and makes them harder to use, and
  • Store them by color so I would use them.


So I put my husband to work making dividers for my drawer.  He cut foam core into strips and we used two sided tape (that Creative Memories photo tape that is still in my stash) to put them together. I guessed at the size of the sections but new I wanted a few larger compartments because I had more of some colors.  We ended up with 13 sections.

Then I cut apart the backing on the enamel dots  so that I had strips that were a single color.  I put those into the sections of the drawer.


It works great.  It is easy to dig for just the right size and color.  It is easy to put new ones away (I am trying hard to buy none since I have a lifetime supply but they occasionally come in kits and once in a while I forget myself.)  And honestly - I am using them more because it is easy to pull out the drawer and find something that works.

Hope you're having a good week - thanks for stopping by.

Wednesday, February 17, 2016

Workspace Wednesday - The Washi Wall

Washi tape is so much fun - and it must be one of the best values in scrapbooking.  It is inexpensive and comes in an infinite variety of colors, patterns and widths.  And let's be honest - how often do you finish a roll of washi?


But it's easy to get overwhelmed by washi - for a while it seemed like every kit I purchased included a roll of washi tape.  And I kept seeing new rolls - and they were only a few dollars which made for a perfect impulse purchase. I tried keeping it in a basket, but I would forget what I had and it rarely got used.  As I've said before, I like my stash organized by color and I use what I see.  So that stash kept growing.

Then I talked my husband into hanging a giant pegboard in my craft room.  It is amazing, versatile storage and provided the perfect solution for washi tape storage.  I devoted one end of the peg board to washi tape - I call it the "Washi Wall."  I bought several dowels and my husband cut them into 12 inch lengths for me.  I used hooks on the peg board and fit 12 dowels down the side of the peg board.


I sorted my washi into a loose ROYGBIV order and started putting it on the dowels.  Neutrals are at the bottom of the wall.


Embarassingly, I had more washi tape than I had room for.  So I purged a lot - and I limit myself to the space on the Washi Wall.  If I get a new roll of washi tape and it doesn't fit, another roll has to go.  For the most part, this has put a stop to my washi buying habit - I have to really love it to buy it.  And because my stash is visible, I have a good sense of the colors and patterns in my stash - often I already have something similar to the roll that is tempting me.

And I actually have finished a couple of rolls recently - which made room for some new rolls - or to bring a roll back in from my purge box.  And means I am using more than I am buying - at least when it comes to washi.  (You have to count the small victories, right?)

So this is my solution - and one my favorite things about it is the versatility.  If washi becomes a smaller part of my stash - I haven't invested much in storage solutions and its easy to repurpose the space to store my new favorite supply.  But I'd love to hear what you do with your washi...

Thanks for stopping by.

Wednesday, February 10, 2016

Workspace Wednesday - Scraps


I'm a bit of a paper addict and have the hardest time throwing away even a small piece of paper I love.  So sorting, storing and using scraps is a constant challenge in my scrap room.   But I have finally developed a system that works for me,

Most of my scraps are sorted by color or pattern and stored in hanging files.

The hanging files go in this pretty wood file box on the shelf by my desk - in ROYGBIV order of course - patterned paper categories are in the back and vellum/transparencies are in the front.  I like to have papers sticking out the top  (so long as it doesn't get totally out of control) because it helps me remember to use them. 


 I usually try to look here first when I am working on a layout and decide that I need to add a particular color or pattern.  This works really well for larger scraps but small pieces tend to drop to the bottom of the folders and get forgotten.

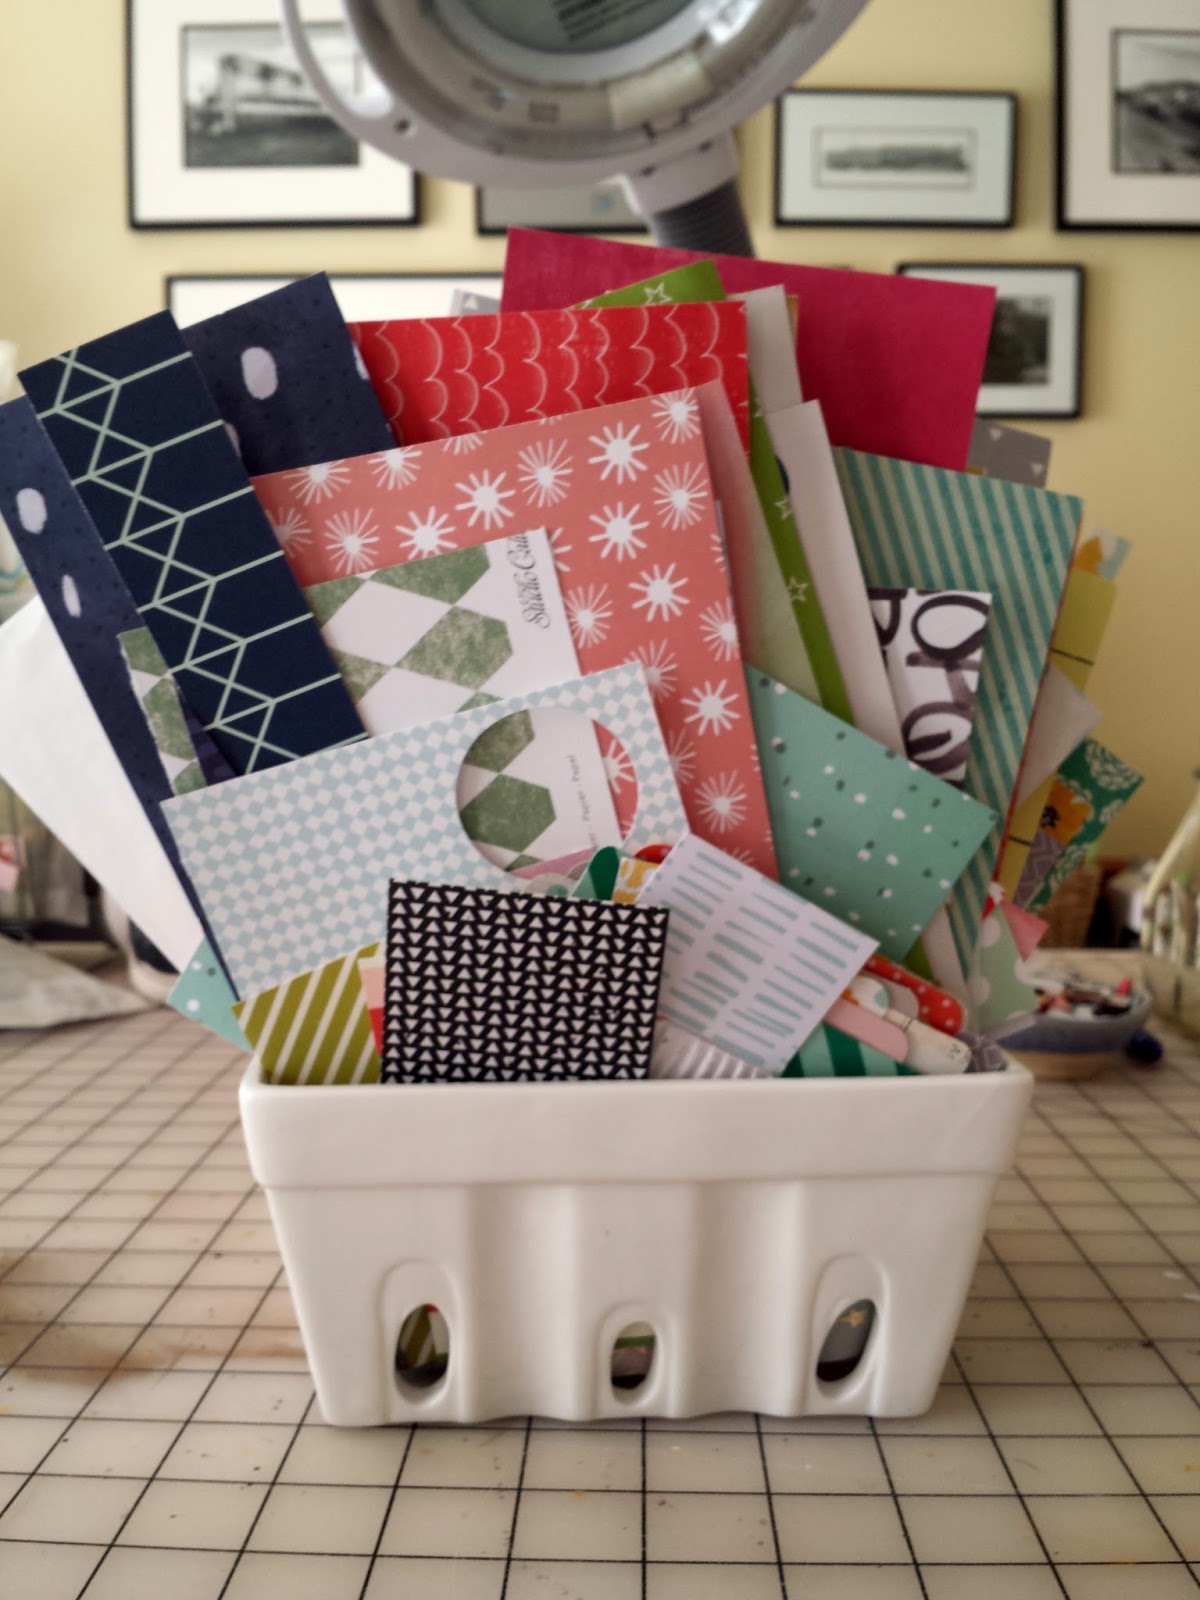
So I bought a pretty ceramic berry basket at Marshall's to sit on my desk and hold small scraps.  These pieces are great for layering.  It often saves cutting and rummaging through the papers sometimes means I add a color or pattern that would never have occurred to me if I hadn't seen it.


 I don't have any rules about how small is to small or when a scrap goes into the folders instead of the baskets (except that it has to fit in the basket.)  When I am trying to decide whether to keep a scrap I consider size, how much I like the paper, how I think it will work for layering, and if I have larger scraps or even another full sheet.  If I love it and can't get more, it is quite possible that no piece is too small to keep. 

And of course the real trick to keeping scraps under control is to go through them regularly.  I find that I need to go through the berry basket every 2-3 months and the folders once or twice a year.  And I don't think too hard about whether to keep a scrap when I am purging.  I try to go with my first instinct.  And if I don't throw away as many as I hoped, it just means I will need to purge again sooner rather than later.  I cleaned out the berry basket Sunday - so now it looks like this. 


Are your a scrap hoarder or a scrap tosser?  Do you have any tricks for keeping scraps under control?

Share your tips - and thanks for stopping by.  I hope you have a wonderful Wednesday.


Wednesday, February 3, 2016

Workspace Wednesday - Big Alphas

One of my favorite trends in scrapbooking right now are those over-sized chipboard alphas.  They are so much fun and have such an impact on a layout. 


I found room for the first couple in the back of the drawer holding mini alphabets.  But as my collection grew, I needed to find a place to put them.  And I knew I wanted to keep them somewhere where they were visible and easy to use - remember this year I want to use my stash.

I had a pile of Avery Elle Stamp and Die Storage Pouches sitting in a drawer (left over from a stamp de-stash).


When I tried it out, an alphabet fit perfectly in one of the pouches.  That solved one problem - it was easy to use and see the alphas if they were stored in these clear pouches.


But I still needed to keep those pouches somewhere - so I went shopping.  And I found a pretty wire basket with copper accents at Target - it sits on a shelf and holds the pouches carefully.  I can see the alphas and remember to use them. 


It's working great so far.  I am using the alphas and they are staying neat and organized.  And I have a use for all those Avery Elle Pouches sitting in a drawer. 

What's your current organization challenge or best solution - I am really working on organizing my supplies better as a way to use them more.  I'd love to hear your ideas.

Wednesday, June 10, 2015

Color Theory Labels

Happy Workspace Wednesday!  My real workspace (where they pay me)  is crazy busy right now, but I have dreams of spending more time in my fun workspace.  It's full of pretty things that make me happy - like this bowl full of color theory labels.


Thanks for stopping by.

Wednesday, April 22, 2015

Three New Things

My husband frequently says that I like organizing my supplies more than I like using them.  That's an overstatement, but I do love trying to figure out the best way to organize my stash.  Like most scrappers I am most likely to use what I see.  My goal is to make it usable, to make clean up easy and to avoid hoarding.

So over the past couple of weeks I have added three new storage things to my scrap room to try and speed up my scrapping.  The first is for all those pretty tear strips on patterned paper.  I never want to throw them away, but if I put them in my scrap folders they seem to get bent or I forget about them.  So now I have them out near my trinner where I see them - they are visible so I remember to use them, they stay straight this way, and the container is right where I cut them off paper, so they go right in. 


Other long narrow strips of patterned paper are going in here too.  I am really liking how this is working, so now I am on the hunt for a pretty tall container to take up permanent residence here.

The second is for small scraps that I want to save for layering.  I had been sticking them in with my larger scraps.  But then I forgot about them or didn't want to bother digging them out, so I just kept cutting new sheets of paper.  And eventually I threw them away.  So I found this pretty porcelain berry basket at Marshall's to sit on my desk.  It is full of small pieces of paper that are perfect for layering.  


I intentionally got something that wasn't too big.  This will force me to clean it out periodically so that the little pieces I'm saving don't get totally out of control. 

And my favorite new thing - a basket for embellishments that sits on my desk.  It holds a mix of brand new and older things that I am currently loving.  It is a mix of products that I can go to first when I am looking for those perfect bits that make a layout special.  (If I don't find something there I can still go to my stash.)

 
 I am hoping this will help me use things up, keep my desk more organized and speed up my projects.  And my plan is to clean it out every month or so to move things in and out so that the mix is always fresh.  So far, I love how this is working.

Share your favorite storage tips below - I am always looking for new ideas.

Thanks for stopping by.


Wednesday, November 26, 2014

December Daily-ish - Getting Organized

So now that I've pulled all that pretty paper and all the fun embellishments out, I need a way to store them.  I know lots of people use pretty trays with little bowls and I love that idea.  But the only place I would have to leave the tray is on my desk and this isn't the only project I will work on over the next month or two.  And I love the idea of using muffin tins - vintage or new - to sort embellishments.  But again - where am I keeping the muffin ins?

So I needed a solution that would allow me to put the project away when I wasn't working on it.  I looked at an empty iris box in the basement, but it wasn't big enough and I wasn't sure how I would keep the supplies organized.  And, to be honest, I am always looking for an excuse to by organizing stuff.  So off to Michaels I went. 

I found an Iris box that is twice as deep as the standard boxes I already have.  I liked that because I could close it up and put the box away.  And with the extra depth, I was pretty sure I could fit all my supplies.  But I still wanted to be able to sort embellishments.  So I was super excited to find a tray with adjustable dividers that fit in the iris box.  And storage was on sale and I had a coupon for 25% off my total purchase.  Those suckers were coming home with me. 

The bottom of the box holds my papers and large embellishments.  I also put in the container of leftover paint from my cover.  I can dig through those supplies easily and everything goes right back in.


I even used a box from a Studio Calico project life kit in the bottom of the box.  It holds the project life cards I pulled out and is easy to dig through.  And I don't have to worry about the cards scattering all over the box.


The tray fits on top of the supplies in the bottom of the box.  I used the adjustable dividers to create the compartments that fit my supplies.  I even divided up the die cuts so that vellum, acetate, and traditional die cuts so I can find what I want quickly. 


When I'm not working on the album, I close up the box and put it away.  And if I do want to go somewhere else to work on my album with friends, I can grab the box and go.  It's not as pretty as those trays with bowls, but it fits my needs perfectly.

Oh you may have noticed that the album itself doesn't fit in the box.  I put all the page protectors in the album and keep it on my desk.  I like to stand it up so that the cover is a little bit like having a decoration on my scrap desk.

Don't forget to leave a comment for an entry into the holiday themed giveaway.  And thanks for stopping by.

Wednesday, November 12, 2014

Workspace Wednesday - The Wall

It's confession time - I love playing with all that pretty paper and those embellishments.  But I think I love sorting and organizing them even more.  And I've come up with some pretty awesome and inexpensive storage options.

Everybody needs to come up with the storage plan that works for them.  And there are really three factors to consider.
  1. How much space do you have?  I'm lucky enough to have a great husband who, with minimal complaining, gave up our dining room so that I could have my own scrap room right in the middle of the house.  (If it wasn't in the middle of things, the odds of me using it were greatly reduced.) And this means I can have "permanent" storage instead of having to put everything in a closet when I am done with it.
  2. How do you scrap?  - I tend to scrap by color so I sort my supplies (paper, inks, die cuts, trim) by color whenever possible.  But if you scrap by collection, your storage should be by collection.  And if you scrap by theme, store your supplies by theme.
  3. Do you like everything put away or do you need to see it to use it?  I definitely fall in the second group.  Anything I can see is 100% more likely to end up on a layout.  If it is put away in a drawer or a cupboard, I won't find it til I do a big purge.  (But it needs to be organized and I try hard to keep my desktop clear.)
So when my inks, washi tape and some other embellishments were piling up, I decided to use a simple pegboard.  My husband helped me get it hung up and I am in love!  It is my new favorite thing.


 First hint:  Don't by a fancy pegboard at the craft store.  Instead go to the hardware store and by the inexpensive pegboard that your husband would use in the garage.  You can cut it to fit your space and paint it white.  And the hooks are super inexpensive.


 My pegboard is basically divided into thirds.  The first third holds shipping tags (sorted on to big rings by color), my silkscreens and some random embellishments.  I had no idea how many shipping tags I had bought until I sorted them this way - now I won't buy more unless I need them.  And remember to think about binder clips to hang things that don't seem to be hangable.


The middle has some simple shelves.  The brackets are just 6 inch pegs.  The shelves are boards my husband cut for me.  And that little basket holds my glue dots, tiny attacher, and misc adhesives.  Plus there is room to show off some pretty things -- like that Ashley Goldberg print and that beautiful card I received in a happy mail exchange at Studio Calico.


And the last third is for washi tape.  I am using 12 dowels cut into 12 inch lengths and simple hooks.  The dowels are long enough to hold quite a few rolls of tape and short enough to be easy to use.  And I know that it is a lot of washi tape - but I don't think I ever finish a roll.

If you have a good storage tip, I hope you will share it in the comments.  I am always ready to reorganize!

Giveaway alert:  If you haven't commented yet, don't forget my blog rebirth giveaway.  It's open til Sunday, November 16th.

Thanks for stopping by.